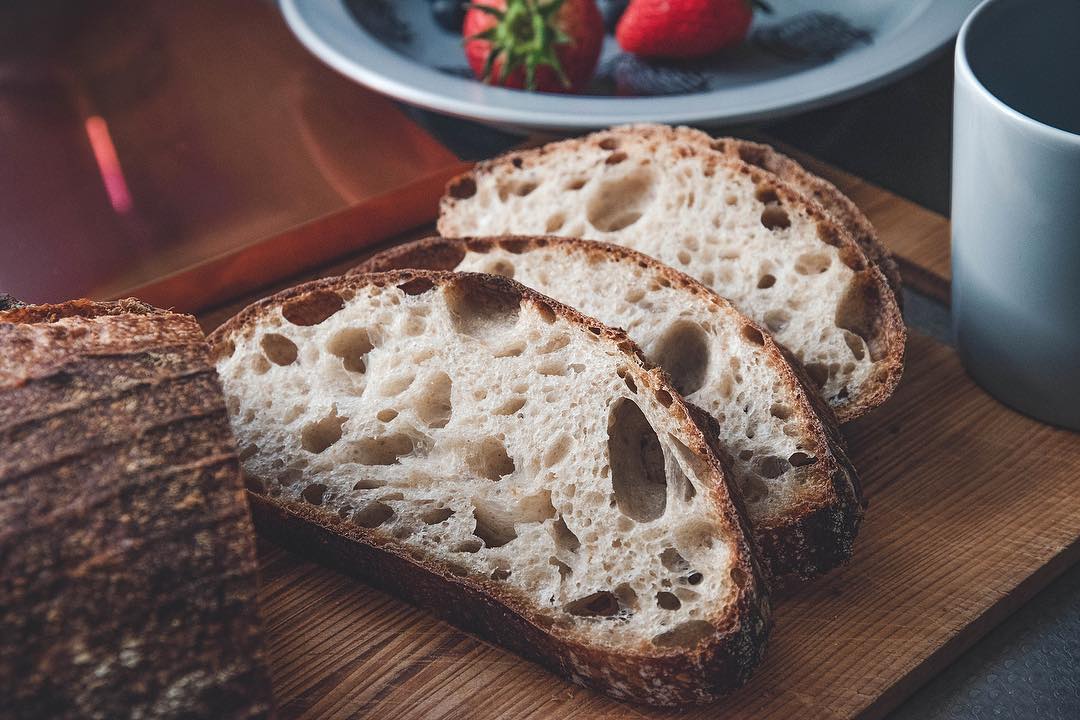
Artisan Bread Recipe: Easy Crusty Homemade Bread for Beginners

Few things compare to the aroma of freshly baked artisan bread. With its crisp golden crust, chewy interior, and rustic appearance, artisan bread has become a favorite among home bakers around the world. The good news is that you don’t need professional equipment or years of baking experience to make bakery-quality bread at home.
This easy artisan bread recipe uses only a handful of pantry staples and simple techniques. Whether you’re baking your very first loaf or looking to improve your bread-making skills, this guide will walk you through every step.
What Is Artisan Bread?
Artisan bread refers to bread made using traditional methods rather than mass industrial production. While there is no single legal definition, artisan bread typically has these characteristics:
- Made with simple ingredients
- Minimal processing
- Longer fermentation for improved flavor
- Crisp crust
- Soft, airy crumb
- Hand-shaped loaf
Unlike many commercially produced breads, artisan bread often contains no preservatives, dough conditioners, or artificial additives.
Long fermentation allows natural enzymes and yeast to develop deeper flavors and improve texture.
Why You’ll Love This Recipe
This homemade artisan bread recipe is ideal because it is:
- Beginner-friendly
- Requires only four basic ingredients
- No special bread machine needed
- Crispy bakery-style crust
- Soft, chewy interior
- Budget-friendly
- Great for sandwiches, soups, pasta, and breakfast
Once you bake your own loaf, you’ll quickly understand why homemade bread tastes so much better than store-bought varieties.
Ingredients
You’ll need:
- 500 g bread flour
- 10 g salt
- 2 g instant yeast
- 375 g lukewarm water
Optional additions:
- Olive oil
- Sesame seeds
- Flaxseed
- Sunflower seeds
- Rosemary
- Garlic powder
- Whole wheat flour (replace up to 20%)
Equipment
You don’t need expensive tools.
Helpful equipment includes:
- Large mixing bowl
- Kitchen scale
- Dough scraper
- Dutch oven or baking stone
- Sharp bread lame or razor
- Cooling rack
- Clean kitchen towel
A Dutch oven helps trap steam, producing the signature crispy artisan crust.
Step-by-Step Instructions
Step 1: Mix the Dough
Combine flour, salt, and yeast.
Add the water and stir until all flour is hydrated.
The dough will look shaggy and sticky. This is completely normal.
Cover the bowl.
Step 2: First Rise
Let the dough rest for 12–18 hours at room temperature.
During this time:
- Yeast develops flavor
- Gluten strengthens naturally
- Air bubbles form
- Dough becomes easier to handle
The dough should approximately double in size.
Step 3: Shape the Dough
Lightly flour your work surface.
Gently fold the dough inward several times to create surface tension.
Avoid kneading aggressively, as this can remove valuable gas bubbles.
Shape into a round loaf.
Step 4: Second Rise
Place the dough on parchment paper or into a proofing basket.
Cover and let rise for 45–90 minutes.
Meanwhile, preheat your oven to:
230°C (450°F)
Place your Dutch oven inside during preheating.
Step 5: Score the Dough
Use a razor blade or bread lame to make one deep slash across the top.
Scoring allows controlled expansion during baking.
Step 6: Bake
Transfer the dough into the hot Dutch oven.
Bake:
- 30 minutes covered
- 15–20 minutes uncovered
The finished loaf should have:
- Deep golden crust
- Hollow sound when tapped
- Internal temperature around 96°C (205°F)
Step 7: Cool
Resist cutting immediately.
Allow the bread to cool for at least one hour.
Cooling lets moisture redistribute inside the loaf for the best texture.
Baker’s Tips for Perfect Artisan Bread
Use Bread Flour
Bread flour contains more protein than all-purpose flour, producing stronger gluten and better structure.
Measure by Weight
Using a kitchen scale improves consistency far more than measuring cups.
Don’t Add Too Much Flour
Sticky dough is normal.
Adding excess flour often creates a dense loaf.
Create Steam
Steam delays crust formation, allowing maximum oven spring.
A Dutch oven naturally traps steam.
Be Patient
Long fermentation is one of the secrets behind artisan bread’s complex flavor.
Common Artisan Bread Mistakes
Dense Bread
Possible causes:
- Too much flour
- Under-proofing
- Old yeast
Flat Loaf
Possible causes:
- Over-proofing
- Weak gluten development
- Dough handled too aggressively
Pale Crust
Often caused by:
- Baking temperature too low
- Insufficient baking time
- Lack of steam
Gummy Interior
Usually caused by slicing the bread while it’s still hot.
Allow it to cool completely.
Delicious Variations
Whole Wheat Artisan Bread
Replace 20–30% of bread flour with whole wheat flour.
Seeded Bread
Mix in:
- Pumpkin seeds
- Sunflower seeds
- Sesame
- Flaxseed
Herb Bread
Add:
- Rosemary
- Thyme
- Oregano
- Basil
Garlic Parmesan Bread
Fold grated Parmesan and roasted garlic into the dough.
Olive Bread
Add sliced Kalamata olives and rosemary.
How to Store Artisan Bread
Store at room temperature in:
- Paper bag
- Bread box
- Linen bread bag
Avoid refrigerating bread, as refrigeration speeds up staling.
Properly stored, artisan bread stays fresh for about two to three days.
Can You Freeze Artisan Bread?
Yes.
Wrap the loaf tightly in plastic wrap followed by aluminum foil or place it in a freezer-safe bag.
Freeze for up to three months.
To serve:
- Thaw at room temperature.
- Warm in a 180°C (350°F) oven for 10–15 minutes to refresh the crust.
Is Artisan Bread Healthy?
Artisan bread can be part of a balanced diet. Compared with many packaged breads, homemade artisan bread is often made with fewer ingredients and no preservatives.
Potential benefits include:
- Simple ingredient list
- No artificial additives
- Longer fermentation may improve flavor and dough characteristics
- Can provide carbohydrates for energy
- Whole-grain versions add more fiber, vitamins, and minerals
However, artisan bread is still a source of carbohydrates and calories. Portion size and the foods you pair it with are important for overall dietary balance.
Frequently Asked Questions
What flour is best for artisan bread?
Bread flour is generally the best choice because its higher protein content helps develop gluten, resulting in a chewy texture and better rise.
Can I make artisan bread without a Dutch oven?
Yes. A baking stone or baking steel with added steam (such as a pan of hot water in the oven) can also produce good results.
Why is my artisan bread so dense?
Dense bread is often caused by under-proofing, adding too much flour, inactive yeast, or insufficient gluten development.
How long should artisan bread rise?
Many no-knead artisan recipes use a first rise of 12–18 hours, followed by a second rise of 45–90 minutes.
Can I use all-purpose flour?
Yes. The loaf may be slightly less chewy and have a softer structure than one made with bread flour.
Why does artisan bread have large holes?
Large, irregular holes develop from high-hydration dough, proper fermentation, and gentle handling during shaping.
Should artisan bread be refrigerated?
No. Refrigeration tends to dry bread out and accelerate staling. Room-temperature storage is usually the better option.
Can I add seeds or herbs?
Absolutely. Seeds, herbs, olives, roasted garlic, or grated cheese can all be mixed into the dough for extra flavor and texture.
Conclusion
Baking artisan bread at home is one of the most rewarding kitchen projects. With just four simple ingredients, a little patience, and the right technique, you can create a loaf with a crisp crust, soft interior, and rich homemade flavor that rivals many bakery breads.
As you become more comfortable with the process, experiment with whole grains, herbs, seeds, and different fermentation times to develop your own signature loaf. Every bake is an opportunity to improve your skills and enjoy fresh, wholesome bread straight from the oven.